Learn how to add Grammarly to Outlook step by step in this guide.
A grammar check is an excellent add-on to Microsoft Outlook. It’ll help you write better professional emails. While Microsoft Outlook includes a spellchecker and grammar checker, the AI-powered writing assistant within Grammarly is superior.
Grammarly works with Microsoft Outlook easily via the free and premium versions. Here’s a step-by-step guide for adding Grammarly to Microsoft Outlook, which only takes several minutes to complete. First, please make sure you have an active Grammarly account.
Contents
We tested dozens of grammar checkers, and Grammarly is the best tool on the market today. It'll help you write and edit your work much faster. Grammarly provides a powerful AI writing assistant and plagiarism checker.

1. Set Up Grammarly
Go to Grammarly.com and create a free or premium account using your best email or social login. If you’re unsure which version, check out our comparison of Grammarly Free vs Grammarly Premium.
2. Download Grammarly for Your Computer
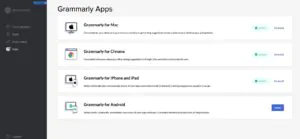
Inside the Grammarly web app, navigate to the app section on the left-hand side toolbar. Now, download the relevant app for Windows or Mac. Complete the installation and log into Grammarly. This app works across all writing apps and is the easiest way to use Grammarly inside Outlook. Note: Previously, Grammarly offered a plugin or add-on for Outlook, but nowadays, it’s easier and faster to use the app for Mac or Windows.
3. Write Emails In Outlook as Normal
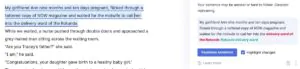
Write emails or work within Outlook as normal. You can still check for grammar errors using the traditional checker or by pressing F7. However, now when you want to edit an email in Outlook, look for the floating Grammarly icon. Click on this to activate its suggestions, including a tone detector and full-sentence rewrites!
4. Use Grammarly In Excel
Grammarly automatically checks your emails for grammar and spelling mistakes as you work. To see and fix these mistakes, work through them using the tooltip navigation. Begin with the critical grammar errors, i.e., those in red. Next, review clarity and engagement suggestions, i.e., those underlined in blue. If you want to grammar check outside of Outlook, copy and paste the contents of your spreadsheet into the Grammarly web app.
If you use custom words as part of your professional emails, for example product names or internal terminology, add these to the Grammarly dictionary. That way, Grammarly will only flag them if they’re written inconsistently. More advanced users may benefit from Grammarly Business. For more on that, read our Grammarly Business review.
Tip: Turn Off Grammarly in Outlook
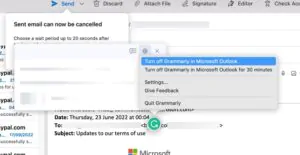
If you find writing in Outlook challenging due to Grammarly’s suggestions, you can turn it off. Click on the Grammarly icon, click on the gear cog, and turn it off indefinitely or for thirty minutes. When you need to reactivate, reopen Grammarly.