Discover the best outliner apps to elevate your writing and organizational skills. Draft cohesive outlines to improve your writing project, academic paper or essay.
Outlining is a great way to get organized. Whether writing an article, developing an app, planning your vacation, or doing anything else, drafting shall help your work be more structured and easier to manage. Digital apps are much better than traditional pen and paper, as they are efficient, accessible, and suited for outlining.
Two apps that stand out as the best outliner apps available on the market are Scrivener and OmniOutliner. Both apps are celebrated for their user-friendly interfaces and useful features for writers looking to create outlines for their work.
No matter if you’re writing an academic paper or novel, these outlining apps will help you bring your ideas together so you can focus on the important part – writing! For tips using outlining tools like these, check out our guide on how to write an outline.

Contents

1. Workflowy

Best for: Minimalists and for those who want something straightforward
Platform Availability: Windows, Mac, Linux, Android, iOS, and web app
Pricing: Basic plan is free. Pro plan costs $4.99/month
Workflowy is an infinite journal that helps create to-do lists, outlines, and notes. It’s a simple, easy-to-use app with great features like real-time collaboration, mirroring, tagging, and global search. Read our full Workflowy review here.
Everything you add in Workflowy is a bullet point; you can expand on that point by creating sub-bullets. This will help you effectively develop outlines and add information under each heading. The interface can be customized to suit your style and other customization options like font, font size, color, etc. You might also be interested in our round-up of the best writing apps for Chromebook.
Pros:
- Intuitive and straightforward: User-friendly interface that’s easy for beginners to navigate.
- Infinite Nesting: Allows unlimited bullet nesting to create detailed outlines.
- Sharing Capabilities: Sharing and collaborating on lists or documents is easy.
Cons:
- Limited formatting Options: Basic text without much control over formatting.
- Lacks Multimedia Embeds: Limited capability to embed images or other media.
- Limited Offline Functionality: Some features may not be accessible offline.
2. Scrivener
Best for: Complex and big outlines
Platform Availability: Windows, macOS, iOS (includes iPad)
Pricing: Standard License is $49 for Mac and Windows; educational license available at a discounted price
Scrivener is a popular tool the world’s best authors use to plan and write their books. It can be used to create both simple and complex outlines. The interface feels like MS Word, making it familiar and easy to use. Unlike other tools on this list, your text has many formatting options. If you are outlining something like a research paper or an article, then Scrivener also has a handy ‘Research’ feature with which you can import and work on research stuff while writing side by side. Read our Scrivener review.
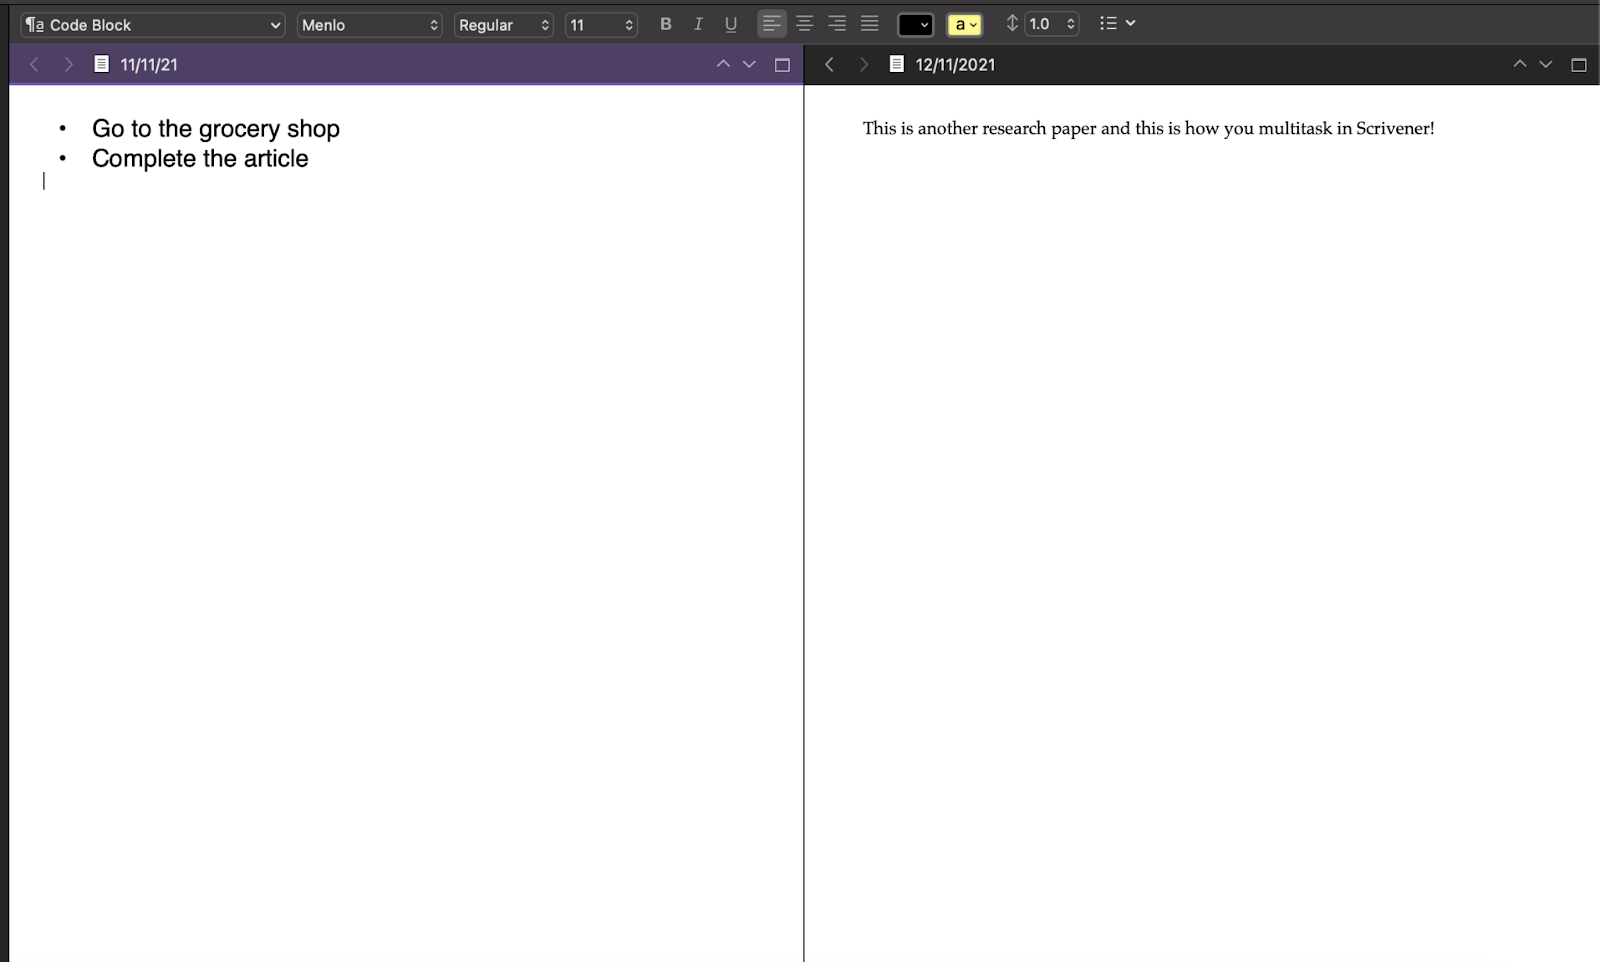
You can also search on a particular page or through your whole project. Apart from the document, there is also a board view, which makes it easy to visualize your outlines. Read our Scrivener review.
Pros:
- Detailed Structuring: Offers in-depth structuring tools for complex writing projects.
- Research Organization: Can store and organize research materials within the app.
- Template Variety: Comes with various templates suitable for different writing genres.
Cons:
- Steep Learning Curve: Can be complex and overwhelming for new users.
- Price: Not free and may be pricier compared to other outliners.
- Limited Collaboration: Not built for real-time collaborative writing or editing.
3. Taskade
Best for: People on a budget who don’t want to compromise much on the features
Platform Availability: Mac, Windows, Chrome Extension, Android, iOS, Linux
Pricing: Free Plan available, $5 starter plan and $10 plus plan
Taskade is honestly one of the best outlining apps I have ever used. It is a perfect blend of features and usability. It has built-in collaboration, chat, templates, keyboard shortcuts, due dates, and various view options.
The interface is intuitive and has a dark mode, which I love using! You can have multiple workspaces and create subspaces inside of them for greater organization. Tasks are easy to make and can be struck off once you complete them. You can also assign specific tasks to specific people and set due dates.
Keyboard shortcuts allow quicker work and increase productivity inside the app. Images and videos can be easily dragged and dropped into your outlines! The many templates cut the friction of writing each task independently, and there are templates for various scenarios. The free plan is generous and provides access to almost all the app’s features.
Pros:
- Visual Appeal: Provides visually appealing templates and workspace customization.
- Real-Time Collaboration: Strong capabilities for team collaboration and synchronization.
- Task Management: Combines task management and outlining.
Cons:
- Limited Advanced Writing Tools: More suitable for planning than in-depth writing.
- Occasional Sync Issues: Some users report occasional syncing issues.
- Subscription Model: Some features are locked behind a subscription paywall.
4. Checkvist
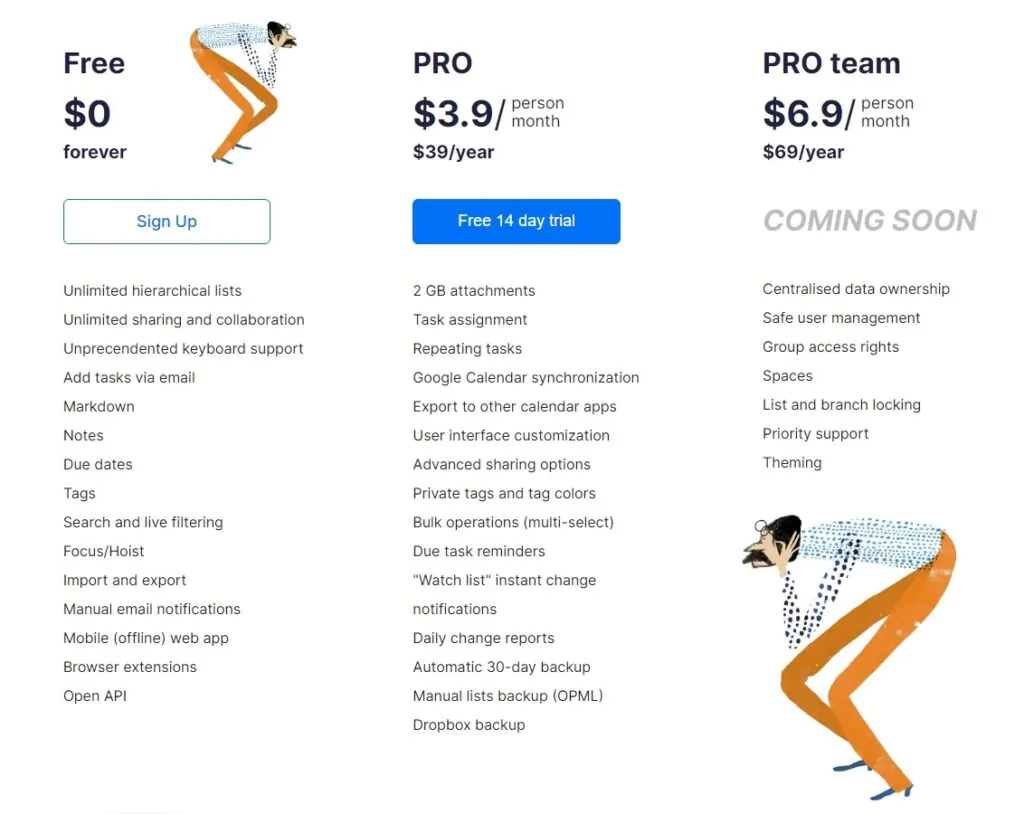
Pricing: Free plan, pro plan $3.9 per month and pro team $6.9 per month
Best for: Productivity
Platform Availability: Web and Mobile Checkvist works similarly to Workflowy, where you can keep on expanding infinitely using items and sub-items. Everything in this app can be done with a keyboard shortcut, and mouse use is limited, although you can still use it. The default interface didn’t feel very refreshing, and I hated the default font. There are customization options in the settings, and you can also add custom CSS to the app.
Apart from the normal features like file uploading, collaborating, tags, due dates, and assigning, one unique feature of Checkvist is ‘Linking,’ which allows you to create a link to some other checklist within your account. This app is for you if you want maximized productivity and don’t mind the interface. Read our Checkvist review.
Pros:
- Keyboard Shortcuts: Offers a myriad of keyboard shortcuts for quick operations.
- Lightweight: Fast and does not require robust system resources.
- Collaboration: Enables sharing and collaborative editing.
Cons:
- UI Design: The user interface might be considered plain.
- Limited Multimedia Capabilities: Restricted multimedia embedding capabilities.
- Limited Templates: There are a few template options for various writing projects.
5. Microsoft OneNote
Best for Students who want a powerful and free all-in-one app
Platform Availability: Windows, macOS, iOS, Android, iPadOS, WearOS, Chromebooks, Apple Watch, Web
Pricing: Free. The paid version is included with Microsoft 365 ($69.99 or $99.99 per year)
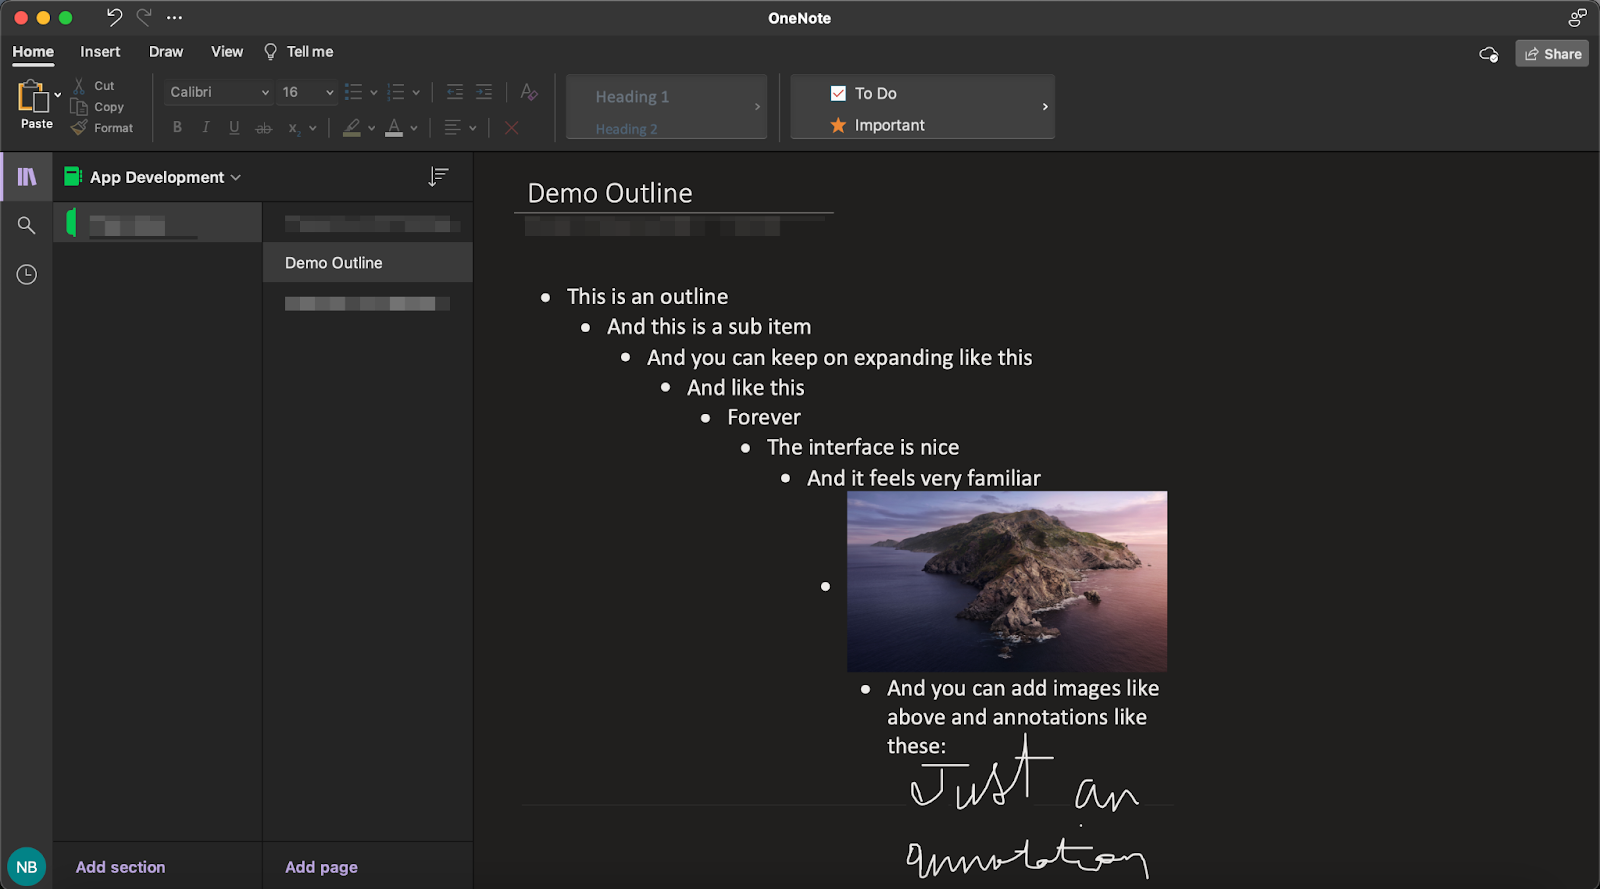
With OneNote, you can create outlines with great organization in notebooks, sections, and pages. Outlines can be customized according to your will and multimedia, like images, videos, and sound.
One of the best parts about OneNote is that it also has built-in annotation, which is excellent if you use an iPad with a stylus for quick, on-the-go outlining and note-taking. The app is free for every Microsoft account and comes with 5GB of free OneDrive cloud storage to store and sync your notes/outlines across devices. Read our OneNote vs. Evernote comparison guide.
Pros:
- Free and Accessible: Widely accessible and free to use with a Microsoft account.
- Multimedia Integration: Can integrate text, images, files, and drawings.
- Cloud Sync: Syncs across devices through Microsoft’s cloud.
Cons:
- Non-Linear format: This can be confusing for those used to linear note-taking.
- Limited Export Options: Exporting notes in a user-friendly format can be challenging.
- Occasional Sync Issues: Some users experience syncing problems across devices.
6. Notion
Best for Teams and Businesses
Platform Availability: Windows, Mac, iOS, Android, and Web Clipper Extension
Pricing: Free plan, $5/month, $10/user/month
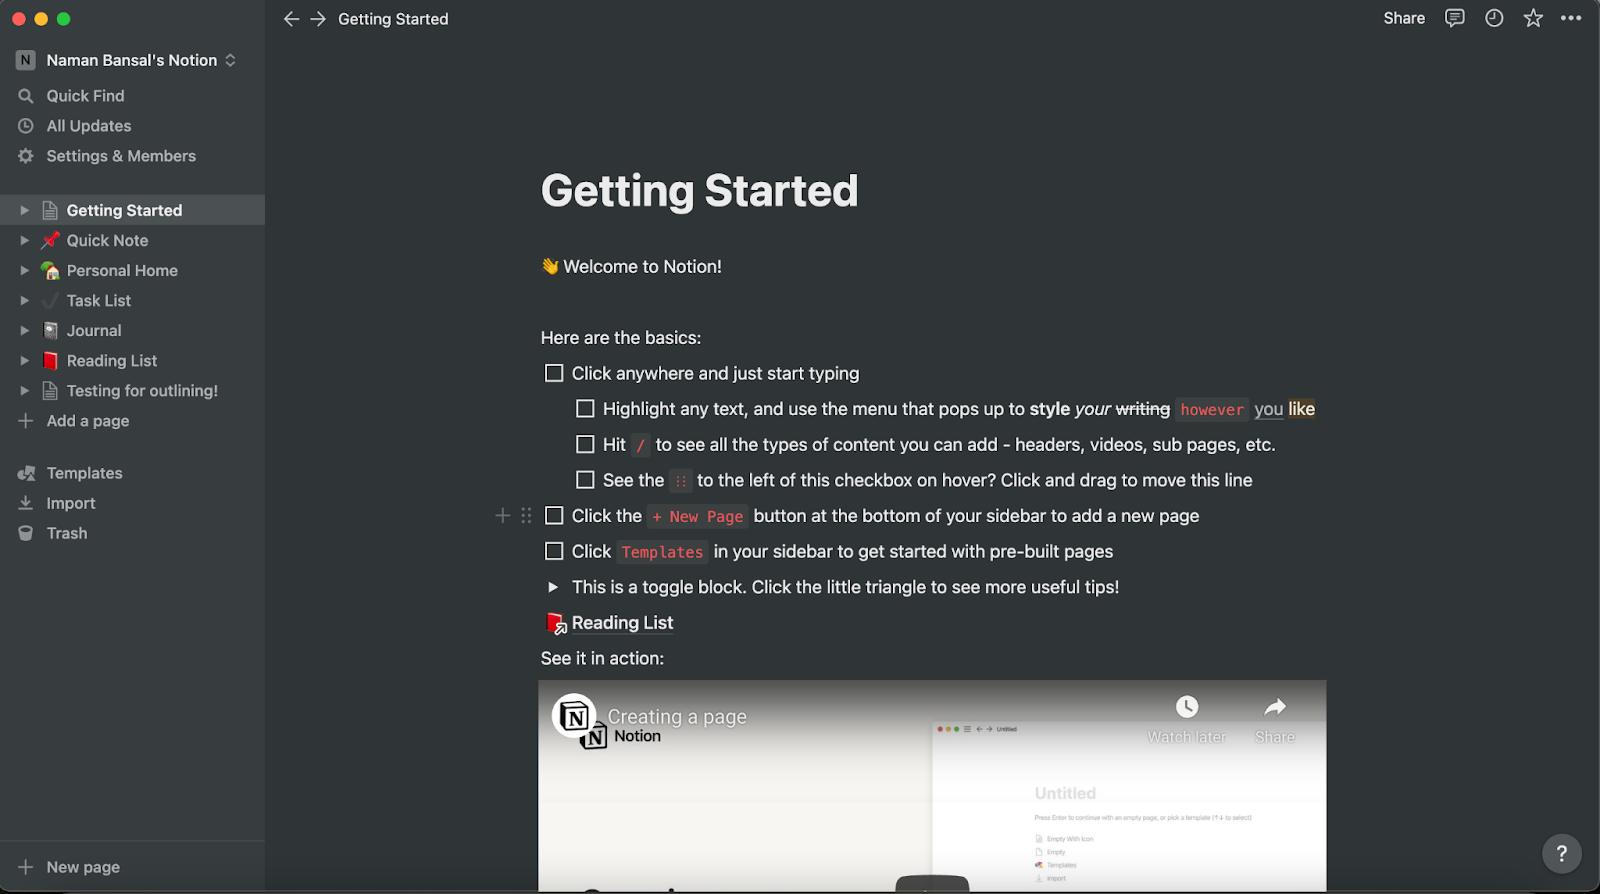
Notion is king when it comes to productivity apps. It can be used for a variety of purposes, including outlining. Most of the other outlining apps work with the concept of bullets, whereas Notion works with the idea of pages.
One page can have unlimited sub-pages that you can keep on expanding. There are various types of elements that can be added to your page, like bulleted lists, to-do lists, kanban boards, lists, tables, galleries, etc. Instead of pages, you can nest some aspects of your page using the drag-and-drop feature. There are tons of templates for any kind of task that you want to do.
The interface is clean and distraction-free, which helps a lot while creating outlines. Another huge plus with Notion is that millions of people use it; hence, tutorials and community support are abundant! Read our Notion review to learn more.
Pros:
- Versatile: Suitable for a wide range of organization and planning tasks.
- Integrated Workspace: Combines notes, tasks, wikis, and databases.
- Customization: Highly customizable with various templates and creation options.
Cons:
- Learning Curve: It may take time to utilize its broad feature set fully.
- Price: The free version has limitations, and full features require payment.
- Performance Issues: Can be sluggish and may have slow load times.
7. Dynalist
Best for: Those torn between minimalism and features
Platform Availability: Mac, Windows, Linux, Android, iOS
Pricing: Free plan, $9.99 per month or $7.99 if you pay per year
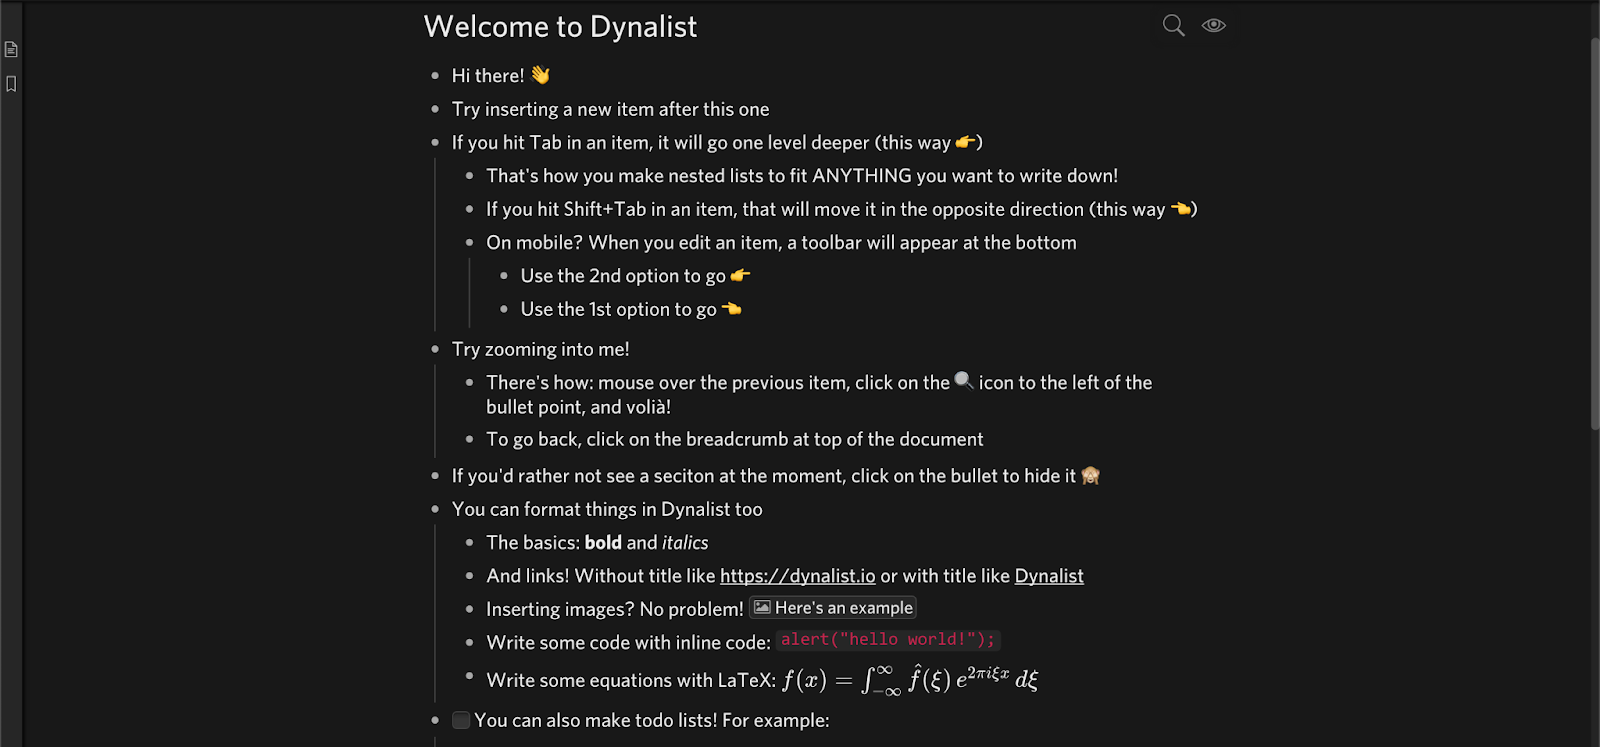
Dynalist is yet another simple but impressive outlining app. It’s as simple as a plain sheet of paper yet has as many (or probably more) features as other outlining apps have. The interface is straightforward and customizable, so you can close all unnecessary panels while working. It’s pretty similar to Workflowy and Checkvist. Many formatting options are available, like typing code, equations, links, attachments, highlight, bold, italics, etc.
You can add due dates, sync your outline with Google Calendar, search through your outlines, create infinite visual hierarchies, add tags, cross-link notes, export to various formats like OPML, plain text, or formatted text, auto backup to cloud storage, collaborate with others and the list goes on! The generous free plan grants unlimited bullets, notes, and other valuable features. Read our Dynalist review.
Pros:
- Hierarchical Lists: Provides structured and hierarchical lists for organized outlining.
- Tagging and Searching: Effective tagging and searching capabilities.
- Sync and Access: Syncs across devices are accessible from various platforms.
Cons:
- Limited Text formatting: More focused on lists and may lack advanced writing tools.
- Pricing: Some advanced features are part of the premium plan.
- Limited Offline Capabilities: Offline access can be restricted, especially on mobile.
8. OmniOutliner
Best for: Apple users
Platform Availability: Mac, iOS, and iPad
Pricing: $4.99 per month
OmniOutliner is a premium outlining app built specifically for Apple users. There isn’t much to the interface. Everything has been neatly hidden above in the menu bar, although this can make finding tools harder.
This tool also works on the concept of infinite visual hierarchy using the indentation of different bullet points. The only difference here is that you see the bullets beside each slate of text after you hover over it. Otherwise, they remain invisible. Search can be used to filter through your outlines. OmniOutliner also syncs your outlines between your iPhone and Mac to allow for work on the go. Read our OmniOutliner review.
Pros:
- Structure Flexibility: Excellent for creating detailed and structured outlines.
- Styling Options: Offers various styling options for personalized outlines.
- Export Options: You can export in multiple formats to suit different needs.
Cons:
- Price: Relatively expensive compared to competitors.
- Platform Limitation: Primarily available for macOS and iOS.
- Complexity: Some users may find the range of options overwhelming.
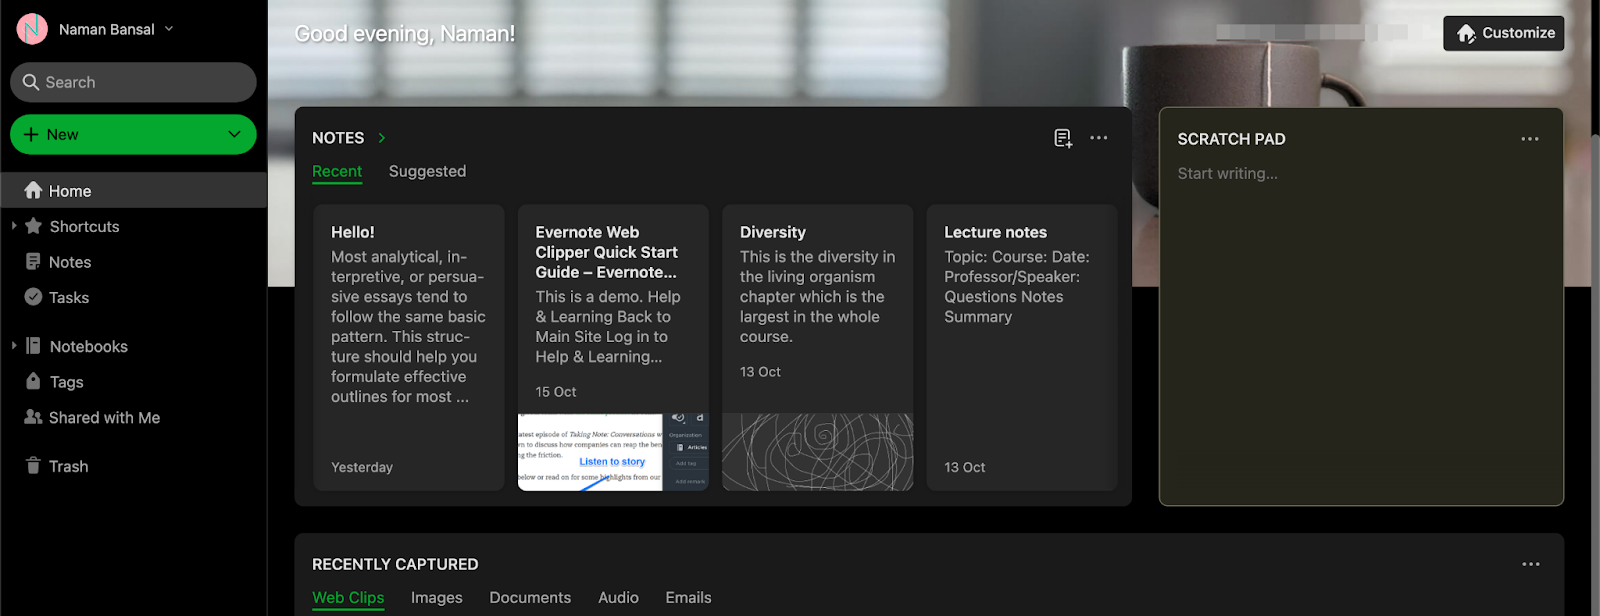
9. Evernote
Best for: Students and Freelancers
Platform Availability: Windows, macOS, iPhone, Android, iPad, and web app
Pricing: Free version, personal plan $14.99/month, professional plan $17.99/month
Evernote, just like OneNote, is primarily a note-taking app; it is versatile enough to work as a good outliner. The interface is outstanding, and the home screen adds a nice touch. You can quickly view the outlines and notes you have been working on and customize the screen to fit your needs. When it comes to the actual editor, it can be easily used for writing notes, making outlines, managing a to-do list, and so on.
There are also lots of templates available to make the process even faster. Many text formatting options and the ability to add elements like code blocks, sketches, attachments, and tasks are available. Read our OneNote vs Evernote comparison.
Evernote automatically syncs all your notes across all your devices pretty much instantly. Collaboration is easy, and you can manage the level of access one has to your document. Read our guide: What is Evernote?
Pros:
- Note-Taking Prowess: Renowned for its robust note-taking capabilities.
- Web Clipper: Allows users to save and annotate web pages.
- Integration: Integrates with various other apps and tools.
Cons:
- Price Hike & Limitations: Recent pricing and plan changes have been controversial.
- UI/UX Changes: Some users disapprove of recent user interface changes.
- Focus Dilution: Some believe it has moved away from its core note-taking essence.
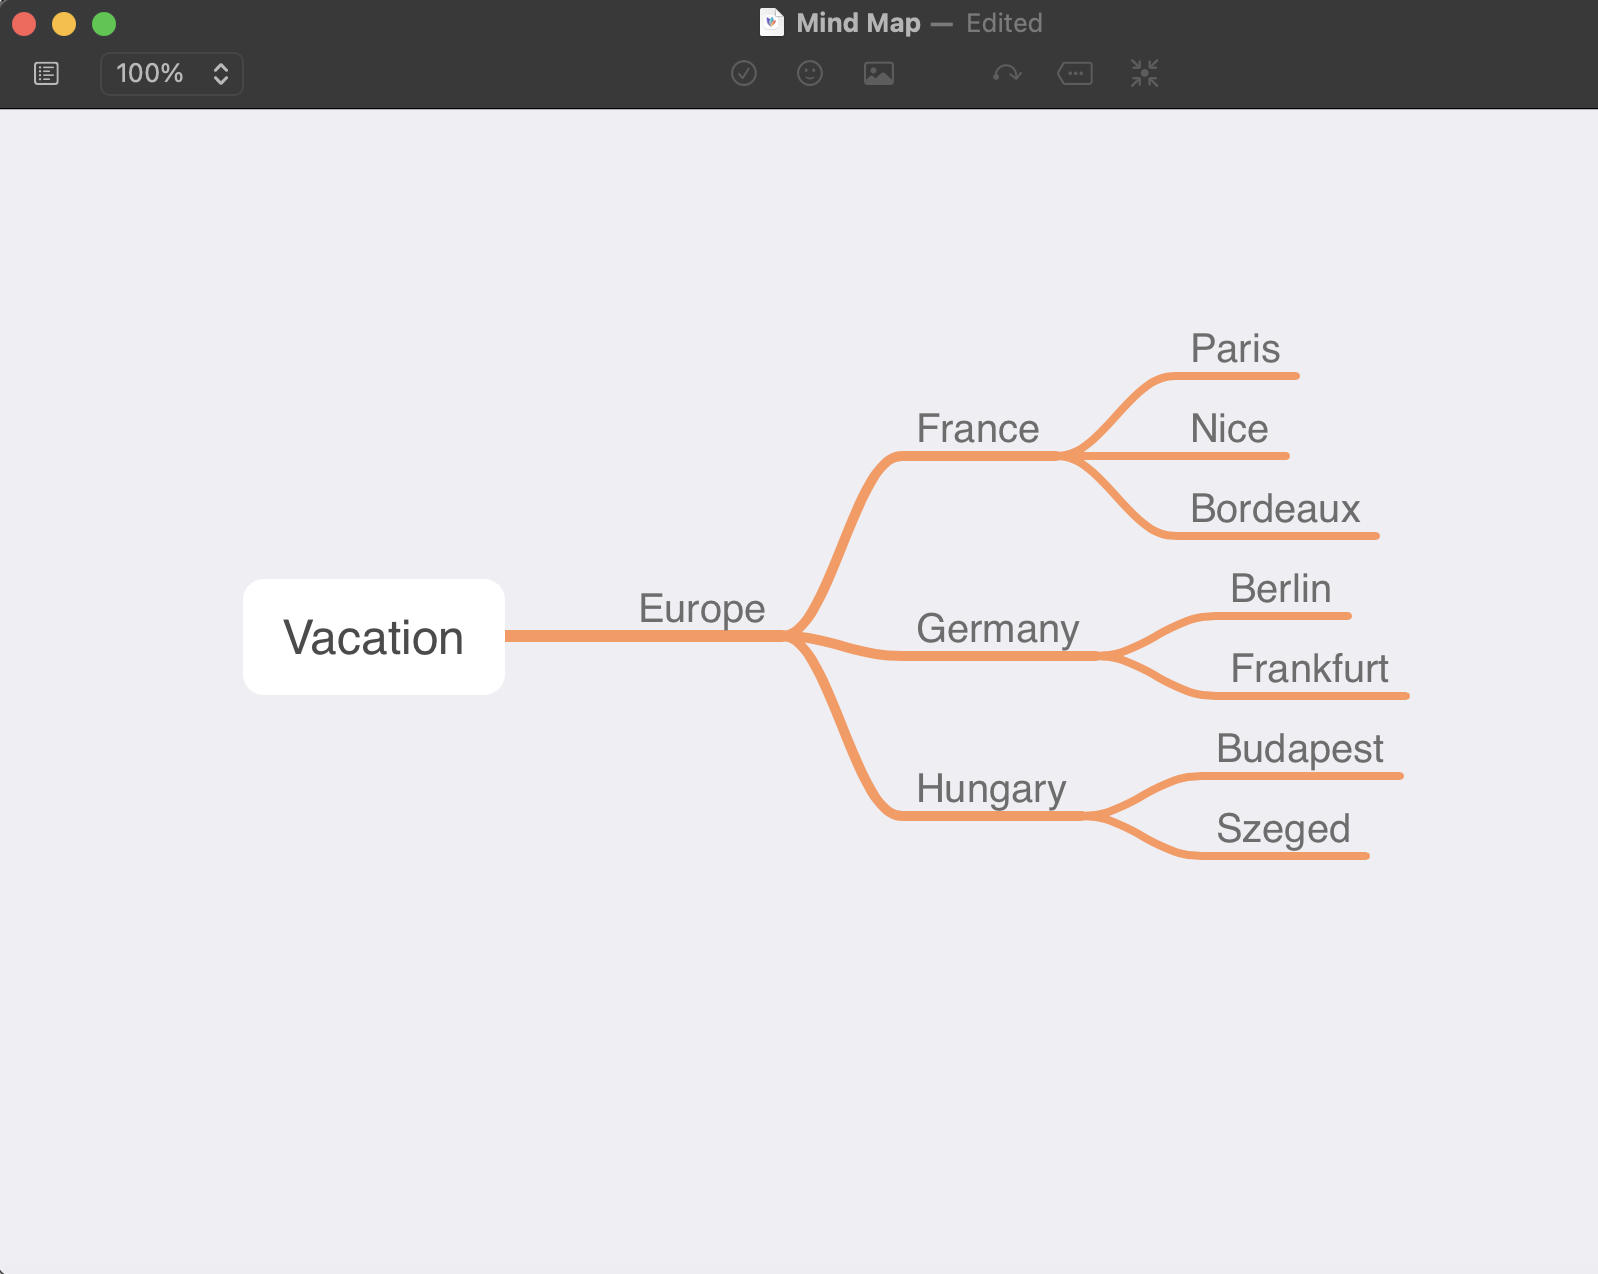
10. MindNode
Best for: Mind-map lovers
Platform Availability: Mac and iOS
Pricing: Free, $2.49/month, $19.99/year
MindNode is an excellent app if you don’t want the traditional outlining experience. MindNode uses mind mapping to help you create outlines, allowing them to be as complex or as simple as you want. The interface is really beautiful and simple at the same time, and there are various customizable themes available.
In terms of functioning, everything you add is a ‘node.’ Every node can be color-coded and categorized for greater organization. You can also transform your nodes into tasks and complete them as you go.
The app also sits on your Mac’s menu bar and iPhone widgets for easier access when you need it. The sync functionality is also great, and your data can be synced between your iPhone and Mac or MindNode and other apps like Apple Reminders, OmniFocus, etc. Read our Mindnode review.
Pros:
- Visual Mapping: Excellent for visualizing thoughts and concepts graphically.
- Intuitive Design: Easy-to-use interface with a straightforward design.
- iCloud Sync: Seamlessly syncs across Apple devices.
Cons:
- Apple Only: Available only on macOS and iOS.
- Price: It’s not free and could be considered pricey for an outliner tool.
- Limited Text Management: More focused on mind mapping than text management.
11. Obsidian
Best for: Combining note-taking and outlines
Platform Availability: Mac, Windows, iOS, Android
Pricing: Free
Obsidian is a popular personal knowledge management software app. It’s free to use and built by the same team who created Dynalist. It supports a wide variety of plugins, too. One plugin enables users to create bullet point outlines inside their notes. After installing this plugin, I could easily manipulate my outlines using keyboard shortcuts.
Compared to Workflowly and Dynalist, it’s slightly clunky and has a learning curve. However, it’s an excellent choice to combine outlining and note-taking. Read our Obsidian review.
Pros:
- Linking Capability: Robust linking capabilities between notes and ideas.
- Local Storage: Stores data locally, providing complete control over files.
- Extensible: A wide array of plugins to enhance functionality.
Cons:
- Steep Learning Curve: Can be complex and intimidating for beginners.
- Limited Collaboration: Not inherently designed for collaborative writing.
- Aesthetic: Some users may find the interface less visually appealing.
Selection Criteria
When choosing the best outliner apps, I considered many key factors. These included user interface, key features, value for money, and device availability. The apps chosen in this list are the best of the best suited to writers who need to increase productivity and create valuable content for their readers. During the review
Why You Can Trust Me
As a professional writer and editor, I’ve spent many hours creating outlines for writing projects for both myself and freelance writers. With years of experience creating outlines, I know what to look for when picking an app. There’s incredible value in ease of use, time-saving organization and an interface that flows. Taking all of this into account, the apps selected in this app round-up are the best of the best for writers and academics to create flawless outlines with ease.